
Q. How do you do the wavy line and then have a different type of paper on the bottom of the page?
A: For this layout, I actually cheated and used paper elements that were already in this shape. (from the TaylorMade, Composure kit on Oscraps). However, it's really easy to do yourself with whatever paper and shapes you like.

Here are the steps:
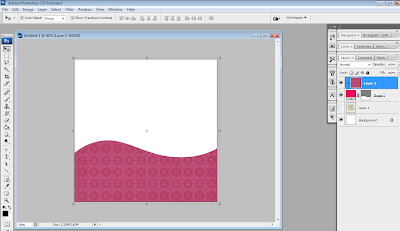
1. First, make sure you have a foreground color selected (any color). Select the pen tool (see tool selected below - click to enlarge) and create your shape. I've added black dots below to show you the pattern you'll follow with your pen tool (just 7 easy point clicks). Make sure you "close" your shape where it began.

2. Now that we've got our basic shape, we need to soften the angles. Hold down the pen tool to reveal the drop-down options, and select the "Convert Point Tool." This tool will help us curve out those 2 sharp points.

3. Once you have the Convert Point Tool selected, select the first sharp peak on the left (you'll know it's selected because your cursor will change from an arrow to the convert tool shape). Then drag the anchor to the right to create your curve.

4. Now that you've got your little rolling hill on the left, do the same thing to soften out the down swoop on the right.

5. Now finally, grab your paper of choice and layer it on top of our new shape. Then, in the layers palette, while holding your alt key, left click the line between the paper and shape layer. And voila!
Then, if you want, you can select those 2 layers (CTRL-click) , right-click, "convert to smart object" and then "rasterize". This will just turn your shape into a more manageable 1-layer bitmap.
6. Then you can do it again with a different paper and position it on the top and a few pixels down.
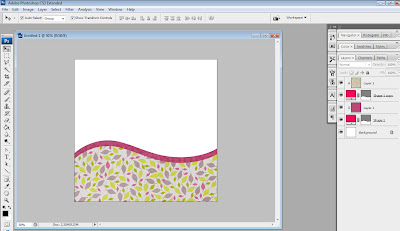
7. And it works the exact same way with shapes. (You can also apply shapes to photos this way)
Q. Did you design that layout yourself (below)? I really like how different it is from Yins templates.
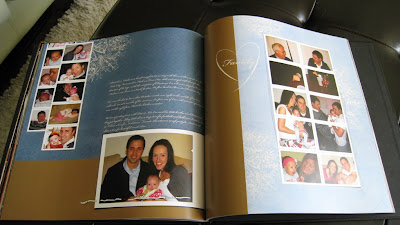
A: I did design this one myself. Nothing fancy...just a few random frames and elements.
Q: pic 9 and 10 (temple square, below)- I LOVE this layout/page. How did you do the red lines and the embellishments. also is this a yin template? Will you just show me how to do a page like this? :)
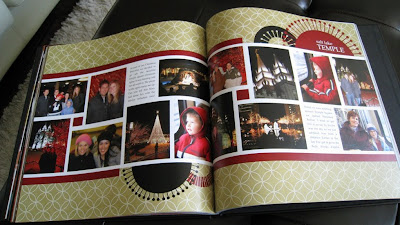
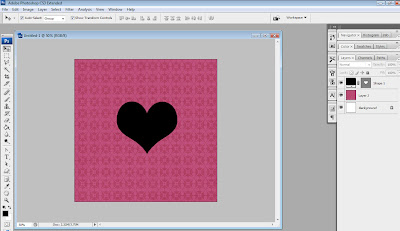
A: This is actually a Yin Template. Free download here. As for the red lines, the template actually came with the border. I think I just applied some red paper to it (like we did above with alt-click). You can also just use the paint bucket tool to fill in solid elements with color.

6. Then you can do it again with a different paper and position it on the top and a few pixels down.

7. And it works the exact same way with shapes. (You can also apply shapes to photos this way)


Q. Did you design that layout yourself (below)? I really like how different it is from Yins templates.

A: I did design this one myself. Nothing fancy...just a few random frames and elements.
Q: pic 9 and 10 (temple square, below)- I LOVE this layout/page. How did you do the red lines and the embellishments. also is this a yin template? Will you just show me how to do a page like this? :)

A: This is actually a Yin Template. Free download here. As for the red lines, the template actually came with the border. I think I just applied some red paper to it (like we did above with alt-click). You can also just use the paint bucket tool to fill in solid elements with color.
As for the circle/snowflake-type elements, I think these came from a Photoshop brush set, but I can't remember where?? Sorry.
Q: pic 11 and 12 (nativity story, below) - I love this one too! How did you do the paper like that?

A: I had 2 of the exact same papers in silver & red so I layered them on top of each other and added a fade gradient to the red paper (blending options) so they faded into each other.
Q: Blue and orange page (below). How did you do the line on this page? Are the snowflakes embellishments?
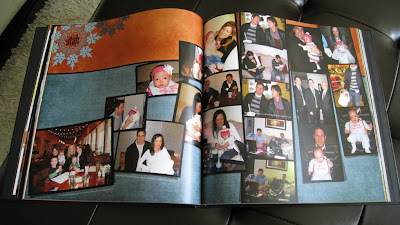
A: You can create lines with the shape tool. And yes, the snowflakes are just embellishments. I believe they are from a Paislee Press Vintage Snowflakes kit. Check on Oscraps.com
Q: New yrs day and new yrs eve pages - are those embellishments on the pages or part of paper?

A: This is from that same circle brush set I used on the temple square LO. I just lucked out with it somewhat matching the paper pattern. (The circles on the top are just part of the paper pattern)

A: And, this, I believe is a Photoshop brush. You can find some cool free PS brushes here.
Ok, so that's A LONG post. Hope it helps in some small way. I probably should have just focused on 1 question at a time. Could you tell I was starting to get a little lazy with my answers? Sorry! I'll do better next time.
No comments:
Post a Comment